Showing posts with label 3d project. Show all posts

Wednesday, November 18, 2009

BLOG WAR CHALLENGE - Petunia Babe

Hi all,

Here is a cute little card which I actually created for last weeks Blog War Challenge and have only just had the time to post it now. Last week BW Challenge was to ccreate a card or LO featuring a pet or animals....

I have named her "Petunia Babe"..... as she is made with Petunia Bazzill and "Babe" named after her inspiration "Babe" from the movie.

So here she is ..

I'snt she gorgeous..(and I think she knows it...lol.....).

Making this card brought back some childhood memories of when I made a paper mache` pig in primary school, painted it pink and added some daisies very simular to these ones. I have also decorated the back of the card but havent added the picture yet.

Happy Scrappin'

Cheers Jo

Tuesday, September 29, 2009

Card Share - and secret revealed

Hi All,

I hope your having a great day ..I am.


I can finally reveal a secret that I have been hiding for the past couple of days...I am in South Australia...surprising my parents and friends for a visit..It is also my Dad's 70th Birthday today Wednesday 30th Sept. That is also why I had to do the hurry bulk lot of Cuttlebug stuff over the past week or so.

Altho this post says I posted it yesterday..I actually drafted it before I went away.

Here is the card I made for him .. I have used SB Paper Argyl - Stripes (4593) Admiral Bazzill (4213) Oatmeal Card, Mini Messages (006KK) , Roman Clock (003KD), Fluer STamp (4190KC), Cute Letter Alphabet (1773LN), Label Numbers (2003LH), Mini Fasteners Antique (4421), Pewter Spiral Clip (4388) Brown Aqua Stitch Ribbon (70907).

The first picture is the front of the card....


The ute stamp is from Stamp It is no longer sold by Kaszazz... I used this image a couple of years ago on a card I made for dad , he loved it, unaware to me that this image meant a lot to him ..it actually reminded him of a car he use to own when he was younger..so that is why I have used this stamp again...Mum actually reminded me the other day how much he loved that card ..So I'm sure he will love this one...


This is the card open....onthe middle section where I will write I stamped the Roman Clock (003KD) image as we are giving him a Watch which is engraved

I will be back at the end of next week after I get back from holidays...

Til then Happy Scrappin' ... Joanne

** PLEASE NOTE *** ..I actually wrote this earlier in the week..(Tuesday before I went away on holidays ) I have only just had a chance to get internet access and to be able to show it on my blog.

Friday, August 7, 2009

METAL EMBELLISHMENTS - Blog War Challenge - Project 3

Hi all,

Here is my project for today's Blog War Challenge.

Metal embelishments used are heart charm from "Girl Things Charms"(4875) and a Polka Dot Brad (4682). The whole project was made from pieces of scraps I had.

Other Kaszazz products used were Parakeet Bazzill (4222), Petunia Bazzill (4400), White card (9127), Flower Paisley SB Paper (4684) from Ooh -la-la Range, Daisy Fabric Flower (4696), Punch 'n' Set Tool (4901), Circle Punch (4856), Corner Rounder, Dark Peony Ink (71032), Pine Ancient Page Ink (72016), For My Friend Stamp (4083KF), Friends Like Flowers Stamp (4048KG), Fancy Flourish (4222KK) and last but not least Magenta Organdy Ribbon (6493).

Im sure I will be making a lot more of these in the future, these are a great idea for party invitations as well.

I hope you like it. Please leave a comment and let me know what you think.


Tag inside envelope

Tag out

close up of metal heart charm

Don't forget to check out Kris's and Tina's Blog (links are on side menu) for their gorgeous creations this week.

Have a Stamperific Weekend.....

Cheers

Wednesday, July 8, 2009

ACETATE " Blog Wars " - Project 2


Hi All,

Welcome to today's project for the Blog War Challenge.

I thought I would make something different than a card today..so I created an Acetate gift box... I have put lollies inside , but could be used to put a lot of things in it, potpourri, bath salts, even a small gift.

I also used Petunia Bazzill and Parakeet Bazzill .. I tied a piece of ribbon around the box and tied a bow at the top and I also used some rhinestones for some bling. You could aslo add a little gift tag to the bow for a personal touch.

Cheers

Monday, July 6, 2009

ACETATE - BLOG WAR - Project 1

Hi All,

I hope you had a fabulous weekend....Mine was filled with relaxing, gardening and household chores...

Guess who stayed up till 4am this morning watching the tennis ..... But it was well worth watching the Wimbledon Final with Roger Federer and Andy Roddick... play went for four amazing hours and 18 minutes.. With Federers win he became the best Tennis player in Modern history..taking out his 16th Grand Slam title..

So I'm really feeling late night/early morning right now...

Well enough about the tennis and onto today's Blog War Challenge....

This is a quick post and I hope I will get better pics of the cards tomorrow..as Im not sure if it was my eyes that were out of focus ..or because the batteries were going flat on the camera but none of the photos I took looked great so this is the pick of the best, plus the card not being as easy as I had planned in my head didnt help..but the end result was this gorgeous card.

I made an window in the White base card and covered it with acetate, cut a slightly larger window in the PInk Bazzill.

The Butterfly image was stamped in Pool -Paint Dabber onto acetate then cut around with a knife.

I added some Icestickles to the underside of the butterfly wings and added some rhinestones from the Flourish bling stickers to highlight the body, attached it to the acetate window using glossy accents... I stamed the Iris stamp on the inside of the card so it could be seen thru the acetate window and then added the Milestones sentiment.


Here is a picture of the inside of the card...


Ok..I'm off to bed..Night all

Tuesday, April 21, 2009

Chinese Take-A-Way Box Template

Several people have asked about a template for the Chinese Take Away Box I created last week (here)....

I have some bad news and some good news.

Firstly the bad news, I atually dismantled a box I bought a while ago from a craft store and traced around it to create my template. I'm not sure how to downsize the pattern and put it on my blog or even how to put it into a document file.... but..

Now the good news...

If you are a Kaszazz consultant (which some of you are) there is a Take-Away box Template in our 5PQ - 008 Cheeky Gift Boxes Workshop - which is very very simular.

Or.... Any one can download a free template simular size and design to what I used from Mirkwood Designs, it also has the assembly instructions on the site ..

Just a tip to score about a 3/4" down on the flaps that arn't marked with "A" and put in holes to be able to tie the ribbon to hold the top closed, like I have. I didnt glue or stick down the side "C" Flaps I punched holes and held in place using brads.

Here is a clickable link to the FREE template:
http://www.ruthannzaroff.com/mirkwooddesigns/takeout.htm

Please respect the authors copyright when using this template.

Happy Stampin'

Friday, April 17, 2009

3d PROJECTS (PoW) - Project 4

Hi all,

I just love these little Chinese Take-a-Way boxes..They are just sooooo cute.

They would make Bonbonnieres for weddings, great for jewellery gift boxes, chocolates, etc their uses are endless.

After tracing, cutting, scoring, then folding my template I used 2 purple Brads from "Tropical Funky FLowers - Paper fasteners" (4419) and some White Organdy ribbon (70651) to hold it all together. Would you beleive there is no glue or tape used for this box except to attatch the stamped image.

Then stamped "Post Mark -Fun" (4040KD) in Vivid Ink - Purple (09017) onto White Card and then punched out image using the Whale Circle Punch(PSPWP01).


**Please leave a comment on any of this weeks 3D Projects (PoW) posts to be in the running to win this weeks gorgeous prize Pebbles Alphabet - Make a Wish Stickers (50686), great embelishments for any papercraft project.

Thursday, April 16, 2009

3d PROJECTS - Project 3

Hi all,

Today I created a little desk caddy with 4 drawers to keep little bits and pieces in ..like rhinestones, brads, album rings and eyelets. So I can keep them at the ready for any project.

I used Aricot Bazzill (4615) and Flower Paisley SB Paper from our Ooh-La-La Range...I think I might add some rhinestones to this for some extra bling.

We have a new BLog War Participant..Leonie. Welcome, I look forward to seeing your wonderful creations. Check out her blog and other participants on the right hand side menu.


**Dont forget to leave a comment on m blog for a chance to win a prize (TBA) ***Competition closes on Sunday..winner announced on Monday.

Wednesday, April 15, 2009

3d PROJECTS (PoW) - Project 2

Hi All,


For today's project I decided to try the Pop - Up Card we have in one of our many gorgeous workshops we have available. In this 2hr Workshop you create three gorgeous 3d projects any little Princess would love to receive - as shown below.


Here is my version (maybe for a male) of the same Pop Up card.


I used Bahama Bazzill (4215), Parakeet Bazzill (4222)and Stars / Stripes SB Paper (4689)

If you would like to attend this workshop or find out more information on this or any other workshop please drop me a note..here


** Don't forget to leave a comment on my Blog to win this weeks prize


Cheers

Monday, April 13, 2009

3d PROJECTS (PoW) - Project 1

Hi all,

I hope you had a great weekend and a fabulous Easter (and didnt eat too many choccy eggs).

My past week hasn't been so fortunate... early Tuesday morning my dad was rushed to hospital via ambulance, as mum described it, he was thrashing about (as though he was having a fit) throwing himself out of bed hitting the cupboard and floor, gasping for air, he was also unconscious ....After many test and scan, he was later diagnosed as having a Brain Seizure, he is slowly recouperating but doesnt remember any of that day, fingers crossed he will be fine..Was/is a very scary time for us all.

Then early hours of Saturday morning my cousin Gary passed away (he was only a year or 2 older than me- (early 40's) .

Well enough of the sad stuff and onto todays PoW. This weeks PoW (Project of the Week) is 3d Projects.

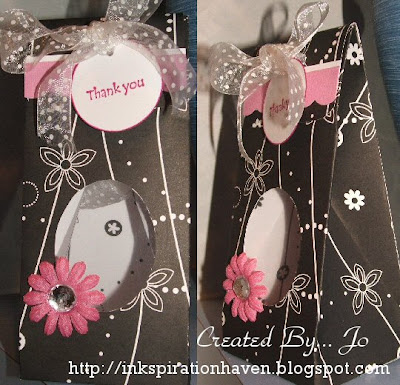
I have created a gorgeous little Peek-a-Boo Gift Box using Flower Frenzy SB Paper (4685) Oh-la-la Papers and Fussy Bazzill. I made this for a friend and will fill it with chocolates but it would also make a great gift bag for any small item.

I used a template I purchased from a craft Fair made by Darcies. After tracing and cutting pattern, I cut a hole in the front using the Oval Curvy Cutter (EKCC07) and covered the hole with Acetate(6238). I trimmed with some white ribbon (70372) Pink Daisy (4696) and 13mm Rhinestone (4557). I stamped "Thank You" from Mini Messages Stamp Set(006KK) in Dark Peony Fluid Chalk onto a Punched Circle and distressed the edge to create the tag.

picture shows front and side views

*******Dont forget to leave a comment on my blog to win this weeks prize **********

Cheers...


Thursday, April 2, 2009

Rollagraph (PoW) - Day 4


Hello All,

Todays card is a 3d effect, and looks stunning (well I think so). Photo doesn't do the the card justice.

I stamped the "Four Flowers" jumbo wheel 3 times onto white card stock - using Ancient Page Black Ink so I could colour the flowers with Lyra AquacolorCrayons(4540)...I trimmed around the border of the wheel on one layer (bottom layer) then I trimmed each flower on another layer (layer 2) then the last one I trim just the centre of the flowers (layer 3).

I coloured the flowers on each layer the same then Magic Mounted each layer then matted this onto Black card and then Parakeet Bazzill. This was matted onto 8 x 8 white Card. I add stamped "Thinking of You" from Mini Messages Set(006KK), then added Glossy Accents (4208)to the centre of the flowers.


Below is a close up of the flowers showing the 3d effect.

***Dont forget to leave your comment on any PoW post for a chance to win this weeks prize.

Good Luck

Happy Stamping

Cheers

Dont forget to check the other Blog War participants for chances to win also

Wednesday, April 1, 2009

Rollagraph (Pow) - Day 3

Hi allAdd Image

Today is a very memorable and exciting day for me, not because its April Fools Day.......but because I got notification that the 4 project cards I submitted to Kaszazz have been accepted as Demonstration Projects...woohooo......

..... ...and............

I have been in Queensland 1 year today (I moved from SA).....Yes April Fools Day. Its hard to believe I have been here one year already, how time flies, and people said I wouldn't make it.

Now to todays project...

I gave myself a bit of a challenge today, I created a box with a flip lid using origami fold....great to put keepsakes in, photos, a mini fold album or even cards and given as a gift...It ties up with a ribbon on the side and the top flap opens like a book cover......half of the challenge was deciphering the instructions..well they were not written instructions ..but diagrams.

The rollagraph "Modern Butterflies" (26123) Jumbo Wheel was used around the edge of the inside part of the box..The Jumbo wheel was the perfect height for the edge of the box..... Of course I stamped the Bazzill before I folded it. I used Lyra Aquacolor Crayons to colour the butterflies(4540)

I used 1 1/2 sheets of Petunia (4400)12 x 12 Bazzill , half a sheet of Circle Dragonflies (47650) SB Paper 12 x 12 from our Gelati Range, some white card for decorating and some ribbon from 'Snow White" range (9599)., Glossy Accents, Dreams Vellum Quote (4410) "Life stamp (4131KI)

Of course you dont have to use a rollagraph on this box you can have the Bazzill plain or use double sided paper. The finished dimensions of the box are approximately 13cm x 13cm and 6 cm depth.

Pictures arnt as good as they should be as I had to rush them, As hubby got all romantic he had a special meal organised at the dining table with all the fine heirloom dishes and cutlery, the works....... (spoilt).

Here is the side view of the box showing the rollagraph wheel used.... the tricky part was to , make sure the butterflies ended up being the right way up when the Bazzill was folded.


This is inside of the box - lid open


This is the top view of the box


Don't forget to leave a comment to be in the draw for this weeks prize.

Check out all the other great creations for the other blog war participants...List is on the right hand side menu.

Til tomorrow...Happy Stamping

Cheers

Related Posts with Thumbnails